Rendering 2D Game Maps in HTML Canvas
I have been wondering what would be the best way of rendering simple but good looking game maps for strategy games such as Civilization 1, Dune 2, etc... The goal is to render maps based on textures instead of having pre-rendered tiles of each terrain type with transitions to its neighbors as used traditionally. This article explains how to write a simple renderer that uses textures and that can blend between various terrain types based on terrain dominance.
I picked an HTML's <canvas> as a technology used by the renderer. I found it extremely challenging to write a renderer for such backend as the performance of <canvas> varies across browsers and its state-based architecture is extremely unsuitable for this kind of job. I don't know if webgl would be faster or not, but since I'm mostly interested in 2D <canvas> seemed like a good challenge.
Game Engine Design
Before I start describing the renderer itself I would like to describe the engine a bit and how I structured it (and you can skip this if you just want to see the results):
Game- connects game rules, game map, map renderer, and user interface.GameMap- defines a game-map, implements basic map operations and algorithms.GameTile- defines a single tile used by GameMap - contains what is required for game to use that tile, doesn't contain any rendering hints.GameRules- provides information about objects in the game and their interaction. There are 7 types of objects that can be added to the rules, the 2 most important for use are Assets and Terrains.GameUtils- static class that contains some helpers used across the engine.
The renderer is completely separated from the engine and looks like the following:
AssetLoader- a class that takes all asset files from game rules and queues them for loading.Renderer- a main renderer class that implements the rendering logic. When attached to the game it starts listening to invalidate events andRendererTile- a tile used and maintained by the renderer. This tile does only contain information about the rendering and is updated every time a tile is invalidated by the game.RenderUtils- utility functions used by renderer - most of the functionality provided here is used only once to process loaded assets into something the renderer would like to use.
When the Renderer is attached to the Game it starts listening to events that invalidate tiles and require them to be recalculated - these events are only related to tiles themselves, not to what happens on that tiles. For example if you move a unit across your territory that won't cause recalculation of the map data, however, if you change a terrain type of some tile, build road, or uncover a hidden tile on the map then the tile and all its surroundings have to be invalidated and recalculated. The game sends invalidateMap (if the whole map changed), invalidateTile if a single tile was changed, and invalidateRect if a rectangular area of tiles was changed.
When the renderer receives such event it uses a bit-array that describes the region on the map that needs to be recalculated. Since invalidating a single tile also invalidates all surroundings, it means that the minimum tiles to be recalculated is always 9 (3x3 matrix, 1 tile and 8 surroundings). I have chosen a 4x4 grid of tiles to be represented by a single bit in a bit-array called dirtyTiles. So when the renderer receives invalidation event it just updates bits in dirtyTiles bit-array and that's it. The recalculation happens later as it's very likely more neighboring tiles will be invalidated in a game play. When the renderer receives instructions to render the map it first checks if there are dirty tiles and recalculates them. After all tiles were recalculated it sets all dirty bits to false and starts the rendering process.
That was a very high-level introduction to the architecture I have developed. The primary goal was to enable fast prototyping of the renderer. Next sections cover all the steps I used to write the texture-based renderer.
Part 1 - The Initial Implementation
The renderer has to be able to render tiles based on their assigned textures. So the first thing to do is to add some assets to the game rules:
rules.assets = [
  { name: "Texture.Ocean"      , file: "ocean.png"          },
  { name: "Texture.Grassland"  , file: "grassland.png"      }
];
And to create terrain that will use the assets defined:
rules.terrain = [
  { name: "Grassland"          , id: TerrainType.Grassland, asset: "_[Texture.Grassland]" },
  { name: "Ocean"              , id: TerrainType.Ocean    , asset: "_[Texture.Ocean]"     }
];
The assets are referenced as _[AssetName]. This could be confusing now as why to change the name, but the reason is that each kind of item in the rules system has its own link format. This means that items of different kinds can have the same name and still be referenced without ambiguity. Rules use references for many things and for example if you have a building and you need something in order to build that building in your city, you will use the system of references and add prerequisites into that building (and the prerequisite could be a nation, technology, resource, or anything else that is defined by game rules).
But back to rendering! If you create two textures called ocean.png and grassland.png, each of them having exactly 256x256 pixels then you can render each texture on each tile by calculating the tile's world coordinates and keeping only 8 bits of them (it depends on the size of the texture, I would recommend using powers of 2, other dimensions will make your work harder, but not impossible). This way you can render something like the following:
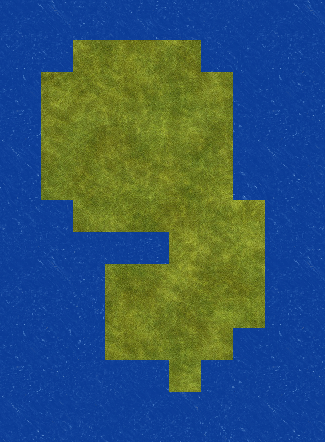
This image is of course not satisfactory!
Part 2 - Adding Blend-maps
To make the transitions between different tiles smooth we use a concept called blend-maps. Blend-map is an image that contains only alpha channel and contains various transitions between two tiles. I started using a blend-map that has 16 tiles, where the first tile is divided into 4 sub-tiles specifying blending of each corner, and next 15 tiles specify blending of sides and their combinations. A blend-map looks like the following (see the arrows of blending for illustration):

Even if it looks chaotic there is a very simple logic behind it. Each bit defines a blending side. The renderer then uses the following bits to describe a side or corner:
- [1] - Top (Side)
- [2] - Right (Side)
- [3] - Bottom (Side)
- [4] - Left (Side)
- [5] - Top-Left (Corner)
- [6] - Top-Right (Corner)
- [7] - Bottom-Left (Corner)
- [8] - Bottom-Right (Corner)
Sides start first and corners follow. I found this logic the best as when you keep only the first four bits you get a mask of 4 sides. Some assets need just these four to render them properly, like rivers, which will be explained later. When you represent these four bits as binary like 0001 and then convert to a decimal form (0001 becomes 1, 0010 becomes 2, etc) then you get the blending sides and their indexes in the blend-map (zero indexed, that's why I put corners first). So for example that last tile has all bits set (1111, 15 in decimal), which means that it's a top-right-bottom-left transition.
From now I will start using the RendererTile to store some information about each tile on the map. At the moment we need just two properties called baseTexture and terrainEdges. Base texture would be set to an ID of texture that would be rendered first (like ocean, grassland, etc). Terrain edges would be calculated this way:
- Get all surrounding tiles of the tile you are recalculating (sides and corners).
- For each surrounding tile, set the particular bit in
terrainEdgesif the tile is not the same, or clear it.
After all tiles are precalculated this way you can implement a very simple renderer that will blend one texture with another based on the tile sides and corners. So for each tile to be rendered do the following:
- Blit the base texture first. For example if the tile is ocean, blit ocean, if it's grassland, blit grassland.
- Blit tile sides based on the first four bits of
terrainEdges, you calculate the x of the blend-map as(terrainEdges & 15) * tileSize. - Blit masked tile corners that represent each quarter of the tile - top-left, top-right, bottom-left, and/or bottom-right.
(NOTE: Rendering of the most complicated tile requires 5 transitions in our case - one for sides and at most 4 for each corner)
To make a masked tile-blit you need to do the following:
- Clear the alpha value of the destination pixels defined by the blend-mask.
- Use destination-over operator to blend the second texture in the transparent area produced by the previous step.
The function may be implemented like this:
// ctx  - Canvas 2d context
// dx   - Destination X
// dy   - Destination Y
//
// tex  - Texture to blend
// texx - Texture X coordinate
// texy - Texture Y coordinate
//
// msk  - Blendmask
// mskx - Blendmask X coordinate
// msky - Blendmask Y coordinate
renderTransition(ctx, dx, dy, tex, texx, texy, msk, mskx, msky, sq) {
  // Clear pixels and alpha defined by the blend-mask.
  ctx.globalCompositeOperation = "xor";
  ctx.drawImage(msk, mskx, msky, sq, sq, dx, dy, sq, sq);

  // Blit pixels that were cleared by the previous operation.
  ctx.globalCompositeOperation = "destination-over";
  ctx.drawImage(tex, texx, texy, sq, sq, dx, dy, sq, sq);

  // Restore the composition operator.
  ctx.globalCompositeOperation = "source-over";
}
If you implement it correctly and render the same data as in Part 1 it would look like the following:
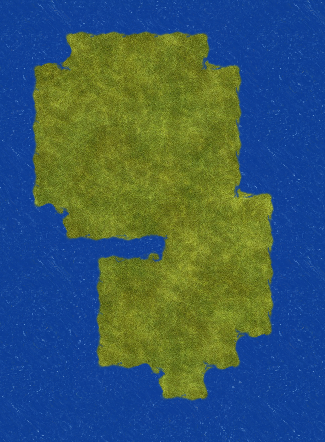
While it's much better than the previous rendering there are many things that can be improved. But before we go into step 3 I would like to present one trick to reduce the maximum number of blends per such transition to one. The key point is to define each logical combination that can happen and post-process the blend-map to have more tiles. I implemented this in the following way:
- First define a table that contains all important corners for each combination of sides.
- Use that table to resolve all possible combinations and create a lookup table where the index is
terrainEdges(with all bits) and the value is a new index to a post-processed blend-map. - Post-process the blend-map to contain all possible combinations.
I implemented it the following way:
function makeTransitionData(sides) {
  const PRE = [];
  const LUT = []; for (var i = 0; i < 256; i++) LUT.push(-1);

  for (var side = 0; side < 16; side++) {
    const effective = sides[side];

    for (var corner = 16; corner < 256; corner += 16) {
      var lutIndex = side | corner;
      var altIndex = side | (corner & effective);

      if (LUT[altIndex] !== -1) {
        // Already in `PRE` table.
        LUT[lutIndex] = LUT[altIndex];
      }
      else {
        // New combination.
        const preIndex = PRE.length;
        PRE.push(altIndex);
        LUT[lutIndex] = LUT[altIndex] = preIndex;
      }
    }
  }

  return {
    PRE: PRE, // Preprocessing table.
    LUT: LUT  // Render lookup table.
  };
}
And then used that table with the following data, where each combination of sides describes all possible combinations of corners:
const TerrainTransitions = makeTransitionData([
  EdgeFlags.Corners                            , // |       |
  EdgeFlags.BottomLeft | EdgeFlags.BottomRight , // |      T|
  EdgeFlags.TopLeft    | EdgeFlags.BottomLeft  , // |    R  |
  EdgeFlags.BottomLeft                         , // |    R T|
  EdgeFlags.TopLeft    | EdgeFlags.TopRight    , // |  B    |
  EdgeFlags.None                               , // |  B   T|
  EdgeFlags.TopLeft                            , // |  B R  |
  EdgeFlags.None                               , // |  B R T|
  EdgeFlags.TopRight   | EdgeFlags.BottomRight , // |L      |
  EdgeFlags.BottomRight                        , // |L     T|
  EdgeFlags.None                               , // |L   R  |
  EdgeFlags.None                               , // |L   R T|
  EdgeFlags.TopRight                           , // |L B    |
  EdgeFlags.None                               , // |L B   T|
  EdgeFlags.None                               , // |L B R  |
  EdgeFlags.None                                 // |L B R T|
]);
The total number terrain transitions we defined is 46 and the preprocessing table contains the following masks:
[16, 32, 48, 64, 80, 96, 112, 128, 144, 160, 176, 192, 208, 224, 240, 1, 65, 129, 193, 18, 2, 66, 82, 3, 67, 20, 36, 52, 4, 5, 22, 6, 7, 8, 40, 136, 168, 9, 137, 10, 11, 12, 44, 13, 14, 15]
And the post-processed blend-map would look like this (note that you should post-process it programatically, not manually):

While it's not necessary to do it this way I found it much simpler to simply preprocess the blend-maps I'm using and use just one call to renderTransition() with appropriate blend-map position. If you plan to render many things per tile then I would consider this trick necessary as it improves performance a lot and it's not memory hungry.
Part 3 - Adding Rivers
The renderer can be improved to support rivers, to do that I did the following:
- Add a new property to the
RendererTilecalledriverEdges - Add a logic to recalculate
riverEdgesto the renderer. - Rivers connections are only side based, so if a tile is a river, then check all four sides, each river or ocean side adds a particular bit to the
RendererTile.riverEdges. - For ocean tiles, check for all neighbors that are rivers and set
RendererTile.riverEdgesso you can render the river flow to the ocean.
Then you would need another blend-map that describes river transitions, I created the following one (and please note how the positions match the terrain blend-map from Part 2):

TIP: if you just started creating your own blend-maps in gimp or PS: create layers and paint your blend-map by using a white color in a transparent layer. Then after you finish you can create another layer, put your texture there and use multiply blend mode to blend the white with the texture. If you do it properly you would see something like this (and this is how it would look on the map):

If you have all of this then it's pretty trivial to add river support to the renderer:
- On a ground tile, check for
riverEdgesand if non-zero then userenderTransition()to render the blend-map at the index specified byriverEdges- it's four bits that means 15 transitions if you ignore the zero index, which only makes sense in editor (it's tile with river without any connection). - On an ocean tile, check for
riverEdgesand render each side separately, use indexes 16, 17, 18, and 19, which provide the flow to the ocean.
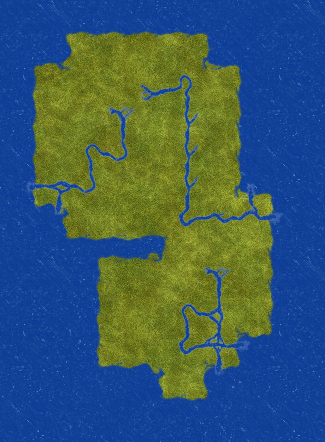
I use an ocean texture for blending rivers, you can have a separate one if you want to make rivers brighter for example. The rendered map with rivers should look like this:
Part 4 - Adding Dominance
Until now we just rendered two kind of tiles (grassland and ocean) and rivers. What if we add more tiles, for example desert, plains, tundra, arctic, etc? Renderers of some games solve this problem in a simple way - they define a texture, which is used between different terrain types as a transitional texture. So for example if I define a desert to be that texture, then all transitions between plains and grasslands would go through desert, etc. The struggle is that this never looks good and it's painful to pick the texture to be used for such transitions. Some games solve this problem in another way - they only allow one kind of tile to be next to another to workaround such issue. But there is another concept that is simply called dominance.
Dominance works this way: Assign a dominance property to each tile and use that dominance to determine which neighbor merges where. Tiles with higher dominance 'dominates' neighbors with lesser dominance. For example if a dominant tile is grassland, and it's surrounded by all plains, then the grassland would be rendered as is and each plains surrounding it would contain transition from the grassland as it dominates it. I found this concept well described here and followed it to create my own implementation.
The first thing I needed is another blend-map for terrain transitions. Currently I use a single blend-map for all terrain transitions, but it's just for simplicity as it's configurable to have more blend-maps and to specify which should be used where. Here is a blend-map that I created for terrain transitions:

And here is what needs to be done to support it:
- Remove property
terrainEdgesfromRendererTile. - Add a new property to the
RendererTilecalledtransitions, which is an array containing pair of values [textureId, edges]. - Add a logic to recalculate
transitionsto the renderer.
The RenderTile.transitions are recalculated by the following way
- Clear
RendererTile.transitions. - Check the tile dominance and loop from
dominance + 1tomaxDominance(maximum possible dominance of all supported terrain types). - For each dominance index check all neighboring tiles and collect bit mask of edges of that particular dominance. If the mask is not empty then add [textureId, edges] to the
RendererTile.transitions. - If the tile is an ocean, set base tile to ocean if the tile has only ocean neighbors, or desert if the tile has ground neighbors. By doing this you create a nice coast that looks like sand into which all neighboring tiles blend.
Then during the rendering process first blit the base texture and then loop over RendererTile.transitions and blend each texture by using the textureId and edges (index to the blend-map). For example if you define the dominance like this:
rules.assets = [
  { name: "Texture.Ocean"      , file: "ocean.png"        , dominance: 0 },
  { name: "Texture.Desert"     , file: "desert.png"       , dominance: 1 },
  { name: "Texture.Arctic"     , file: "arctic.png"       , dominance: 2 },
  { name: "Texture.Tundra"     , file: "tundra.png"       , dominance: 3 },
  { name: "Texture.Plains"     , file: "plains.png"       , dominance: 4 },
  { name: "Texture.Grassland"  , file: "grassland.png"    , dominance: 5 },
];

rules.terrain = [
  { name: "Desert"             , id: TerrainType.Desert   , asset: "_[Texture.Desert]"    },
  { name: "Plains"             , id: TerrainType.Plains   , asset: "_[Texture.Plains]"    },
  { name: "Grassland"          , id: TerrainType.Grassland, asset: "_[Texture.Grassland]" },
  { name: "Tundra"             , id: TerrainType.Tundra   , asset: "_[Texture.Tundra]"    },
  { name: "Jungle"             , id: TerrainType.Jungle   , asset: "_[Texture.Grassland]" },
  { name: "Ocean"              , id: TerrainType.Ocean    , asset: "_[Texture.Ocean]"     }
];
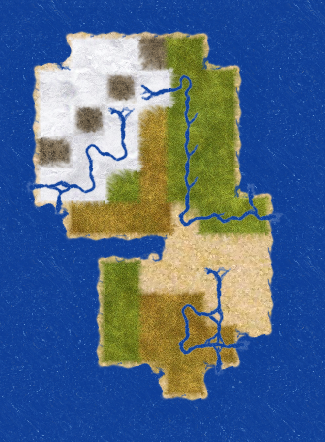
Then the sample map would be rendered the following way:
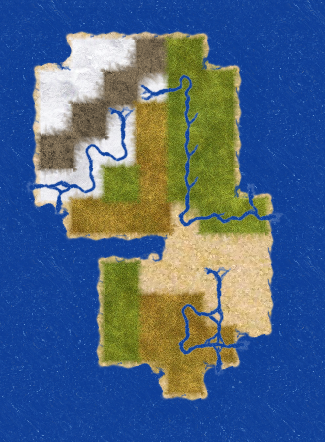
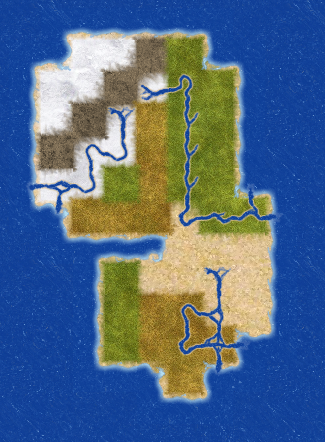
Playing with terrain dominance settings will yield different renderings, for example increasing dominance of arctic would render the same map differently:
It's tricky and the result very much depends on the blend-map used to do the transitions. For example the blend-map I created is good for snow transitions, but I will create different one for other terrain types.
Part 5 - Adding Coast
Let's improve the result of Part 4 by adding a nicer coast and doing it programatically instead of messing with another blend-maps! To create a better coast we need to add a bit brighter sea that surrounds it. What I'm gonna do is to perform some image processing of the original blend-mask within the browser: invert -> blur -> brighten -> combine, as illustrated below on a single tile:

If you process each tile from the coast blend-map and use that blend-map with a much brighter texture it would result in rendering really nice coastline. The following image also uses the same technique to enhance the look of rivers:
Of course, there are endless possibilities of image processing that can be done with blend-maps.
Further Ideas
I didn't implement terrains like hills, forests, and jungle because I don't really have assets for that. So if you have any idea how that can be done, or if you volunteer to provide me such assets I can dig into it. Other things like fog-of-war or uncovered map area are simply about adding more blend-maps and the support of using them into the renderer.
Working Demo
A working demo is now available here!
Conclusion
This article is more like a higher level overview of the implementation that I have designed. However, it should provide an insight into a possible way of implementing a map renderer that uses textures instead of pre-rendered tiles with transitions. The biggest challenge was actually using HTML <canvas> as a target to render the terrain. The result is pretty good as the terrain can be rendered at real-time with smooth scrolling enabled.